Best settings for garments on hanger?

Greetings,
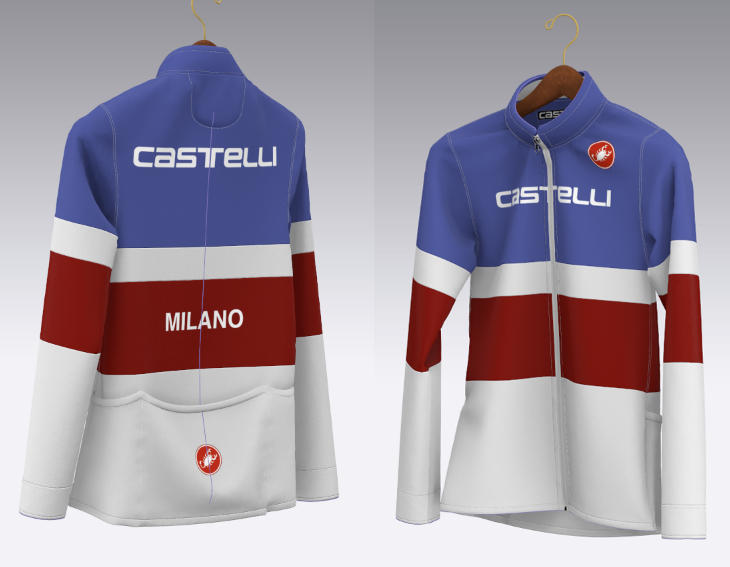
This jacket is draping fairly well in front but not naturally sagging at all on the back and flat as a pancake- I'd like to see more natural "limpness" overall. I'm using the Default Material and have tried Sim at both 10 and 5. The garment colored panels have been Cut and Sewn together and I removed the sewing tension hoping that would help but it didn't. I tried hanger at Skin Offset 1 and 3 with no change. Any advice on what would help is appreciated, thanks again
-
It has everything to do with the particle distance and the fabric physical properties you are using. Find something suitable in the Fabric Presets by changing them and simulating. 5 mm should be best for a more realistic drape.
0 -
Yes, I suspected the Material type would have some effect but was hoping for an answer that would be more helpful. I'll go thru the list and try a few.
0 -
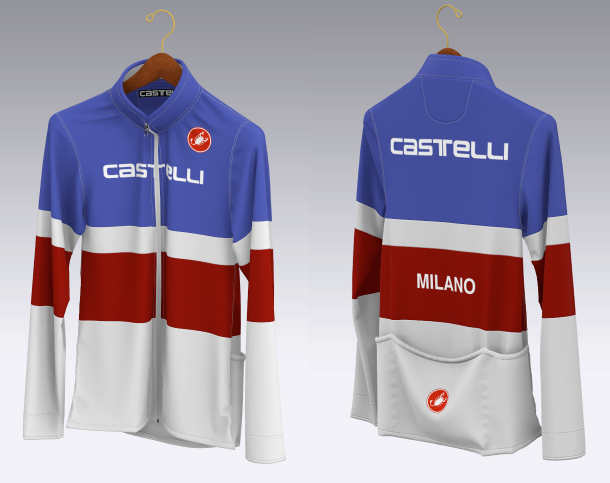
Silk Knit Jersey material did the trick- the back is still a little flat but I'm very impressed w/ Clo
 0
0 -
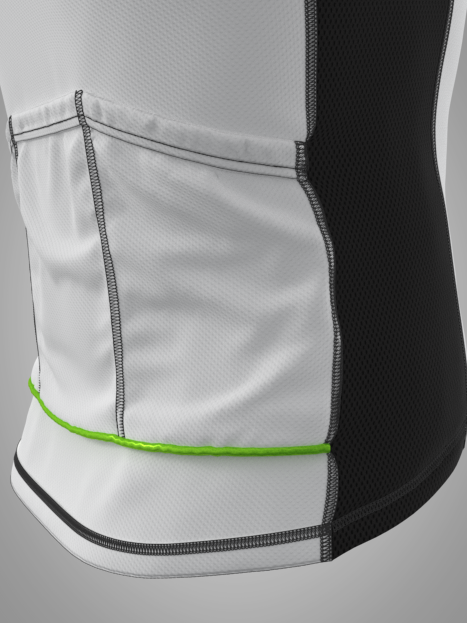
You can probably place a little more stretch into the seam junctions, as cycle shirts tend to pucker a bit in the rear pocket. You can set the pocket warp / weft scale slightly high to create that effect. Below I set the pocket pattern piece to 103% warp/weft and that introduces more volume (surface area) into the garments assembly.

Which can yield a lot more detail in that area.

You might need to add in a little more of that edging and stitching quality that most cycle shirts have in them. For example a pocket has some elastic and upper edge banding sewn in, maybe even a reflective strip (piping) - so you should maybe show that in some manner.
Don't miss out all that stitch and sewing, 'juicy' detailing, it's what makes the garment come alive for the eyes and mind.

Note how you can feel the tension in this pocket when worn, that's because it's really in the simulation and the digital cloth is reacting as it should. The actual 'feeling' this evokes is substantially more nuanced than your build, and that means when I simulate it on a coat hanger or avatar it reacts in the correct manner in these areas. That is by design, and it is important stuff to add in,even if seemingly frivolous.
I generally spend at least 30% of my garment build time of all the stitching and sewing of joints, pucker and radii into a joint. Many people don't place in any attention to this area - which often shows, as they don't factor that into a build. So make sure when you are learning CLO3D that you treat sewing and stitching and edge detailing with the importance it deserves. It's a BIG focus and it consumes the eyes attention at almost every level, as it is what makes a garment construction look believable. You don't need to get too fancy, but you do need to place the elements into the build. If you think missing them out is a short cut - that is true, but then you pay for that approach in the end visual, by it lacking important supporting elements that trick the eye and mind into making a CG item appear more realistic.
Think of it like music. A high fidelity recording captures all the color of noise frequency across wider range and depth, whereas mpeg3 chops it all out and the sound quality (color range of sounds) suffers. Visual fidelity is exactly the same > if you chop out the build elements that the garment has in terms of 'basic' detail, you are reducing the visual fidelity the eyes and brain typically absorb with that product category. So make sure you put in sufficient detail and number of design elements such that when you render, it creates the illusion of having ticked all the construction boxes for feature elements that were actually in the real garment. Sometimes these are not just visual but also physical elements > like elastic (stress/strain). Get to know how these work within CLO3D as settings and you will master the skill of mimicking how garments simulate.
 2
2 -
Thanks so much for your detailed information which I will look over in more detail. I was having trouble getting the folded edging at the bottom hem due to the arced shape and wasn't able to merge the 2 edges together to create a soft fold. The panels on the front sagged OK w/ Silk Jersey Material, but the panels on the back remained flat w/ no sagging. I'm new to Clo and finding that obtaining information is limited and getting advice from experienced users like yourself helps immensely- thanks again!
0 -
You are doing well for a newby. The advice I would give is get a general level of comfort going with the drafting and assembly process, so it feels comfortable to knock out a basic single size pattern in under an hour. Then focus in on the many settings that improve the detailing of a pattern > their sewing angle, the edge thickness and radi, the stitching, elastication, pucker and gathering, then skiving and bonding, and finally strengthen and steam. These are all areas that you can tweak to give yourself more control. Basically all the elements of a pattern can be tweaked, when you understand what constraints to place onto the design element (pattern shape and edge or surface). As your comfort grows so does the level of customization you can add into a garment.
0 -
Thanks again for your advice and pointers- I added the Interlock stitch that helped very much. Got a weird pinching when I added piping similar to yours. I'm experienced using Maya and have no apparel experience but I'm slowly figuring some things out. It's a combination of learning how a garment actually is sewn together and learning the various settings in Clo to achieve something realistic. I had a sewing error on the pouch and its looking better- I'll try your warp/weft settings.The Cotton Stretch seems to work OK but will try more-
 0
0 -
Yes it's a different mind set to make patterns, but it opens up what you can do in the way of last minute edit changes, relative to real world fit for real products.
0 -
ottoline where did you acquire that sport mesh fabric? it looks wonderful
0
댓글