How to make washing effect by seams?

Hello!
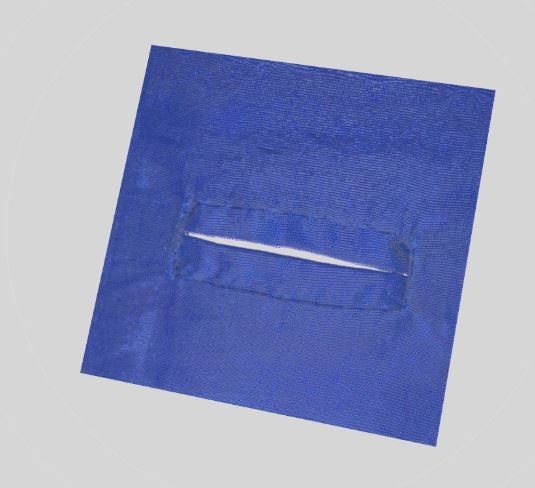
How to make washing effect like on the photo?
I tried to use Puckering, but its invisible, I cant to find way how to make it :( Pls, help to make it.
Many thanks!

-
Have you add the png images of the puckering or just used the normal map?. You can adjust the opacity to reach the effect you want.
It's also possible to make your own png image creating a seamless png if you want.Daniele
0 -
Спасибо, danielemanassero!
Im working on it, but How to make it curve by some curve seams? Need to make several png files for different shapes like side seams and pockets?
0 -
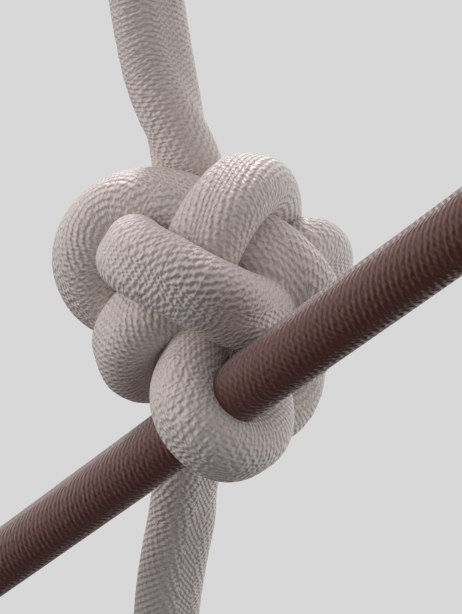
open the puckering property editor then put the puckering texture in the texture box. It will follow the line where the puckering effect has been applied as a topstitch does.
You can find the default puckering texture in the Hardware trim folder> puckering
In the picture, you can see it in action ( I made it red to better show the result )Daniele
 0
0 -
danielemanassero, спасибо! Попробуй сделать это.
0 -
You can also add in some additional settings to improve the seam transition based on the seam stitching offset. You can add in slight creasing (offset internal line with 200 degrees angle). And you can also split the panel (cut and sew) then add in additional thickness and double edge curvature to the mating pattern piece to get that raised 'lip' that jeans give.

You can mix that seam junction relationship to give almost any combination quickly that you can then render with additional fabric creasing. I often make all seams have a slight elasticated value that mimics the foot on the sewing machine pulling the garment seams slightly out of kilter.

If you add in that extra detail along with micro-faceted texture reflection you get pretty good detail running into sewn areas.

I spend a lot of time getting the basic feel of the stitch to height geometry right in a garment (eg: thick wool welt pocket) as that means when you shift texturing onto the garment it looks more realistic > see by contrast thin silk button hole = more creasing around the sewing + stitching.
So a big part of making the garment look real is to ensure you place in the detail. (welt pocket has the pocket in behind so it creates that topography around the welt, even though it is not seen - it is important, and adds to the overall random feel in the CG. And note all the small radi that roll into the welt piece, The double folded radi on the ends, yet the soft single roll over the top - these are not by accident each one is crafted into place, eg: the lower jacket front radi rolls at a bigger radius to the welt (steam pressed) so the wool looks soft and thick. None of these are default settings, everything is fine tuned, tweaked and it pays off in how the over all pocket welt assembly looks 'softer' and made of the right thickness wool at scale. All by design ! Know how to tweak those seam settings they are the magic in any garment assembly. It might be unnoticeable, and at huge effort - but crikey they matter in the long run to all your visuals.

When ever I get free time I am busy making all these types of little sewn edge details to add into my library, (about 350 seam joints now in total) that way I just drag and drop them in as details in future so the settings are there to transpose onto other garments.
I also combine that with matching texture and depth maps (kinda like the CLO3D pucker map) only a lot more refined and a HUGE library of custom seam types that I have built up over the years, from elasticated simulations, frayed edges, fringes, tassels etc. Nothing is impossible. So how to create a Stella seam edge is possibly the single most important area of knowledge after the actual pattern shape and assembly.
Many never practice that skill. Which continually amazes me, as it is so critical to all garments. Seams and stitching are massively important. It makes the CG garment. And so do match textures that dovetail into common seam offsets. All part of how you customize your CLO3D library. A smart CG artisan is going to do that over their learning curve as it creates a distinct visual difference to the work as it accumulates. Like money in the eye-candy bank of nailing down garment detailing.

Stitching will tie you in knots as there are so many options. So good to start practicing early on.
Never pass up the opportunity to make a new seam type as it will add to your library and allow you to nail down any edge detail when you most need it. (always)
I can haul in a staggering array of matching edge, seam, stitch and trim into any of my CLO3D garments. I started that process 8 years ago, and have accumulated a instant drag and drop library that makes anything possible for a CG garment.

I can make it elasticated, with surreal quality of textures seamlessly tiling in.

Or I can take that same base fabric and drop in a lace trim to my own design all on pitch at scale.

I get seemless visual transitions, with photoreal randomness, perfect stitching. All possible when you start tweaking your settings and making your own top stitches, and texture maps. (above as the seam double folds over I paint black into the alpha map so the seam looks solid - you can mix in optical illusions to trick the viewers mind into what is going on in that area - the fabric looks natural, yet it is contrived!). Everything is by design.
To get that edge worn stone washed effect to the fabric in local areas, you should use a texture map to change the color of the diffuse texture in that area. You can also wear down the texture by lowering the height of the texture/normal by offseting the value from top surface texture value. And finally you can add in dye, to those lower areas just like you would use an occlusion bake to add in dirt, only you saturate the image with color instead in those localized regions. So texture editing is key.
Practice, practice, and practice.
0
評論