Importing a JPEG as Graphics

Does anyone know how to import a JPEG as the "Fabric" for a garment and have it match up perfectly?
I work for an athletic company and we make our customers designs in Illustrator -> export them as a JPEG -> upload them as the "fabric" in CLO. But I'm having troubles getting the JPEG to align with CLO.
I can provide screenshots / video if needed for further clarification.
Thank you in advance,
Lauren
-
Hi Lauren. I believe you are talking about the "print" that is applied to the fabric. CLO uses the Texture socket in the Material group for that purpose. Texture, Normals and Roughness channels can be controlled by maps (images like JPEG).
When you plug in a texture image to the Texture socket, you should see a Transformation dropdown where you can rotate and scale the print. You can also scale and rotate, but additionally move the print in the 2D or 3D window by clicking on the Edit Texture button.
Is this what you need?
Pablo
 0
0 -
Hi Pablo,
Thanks for the quick response! I'll attach some images for reference because I think I'm still talking about something different.
So the AI file is exported to a JPEG
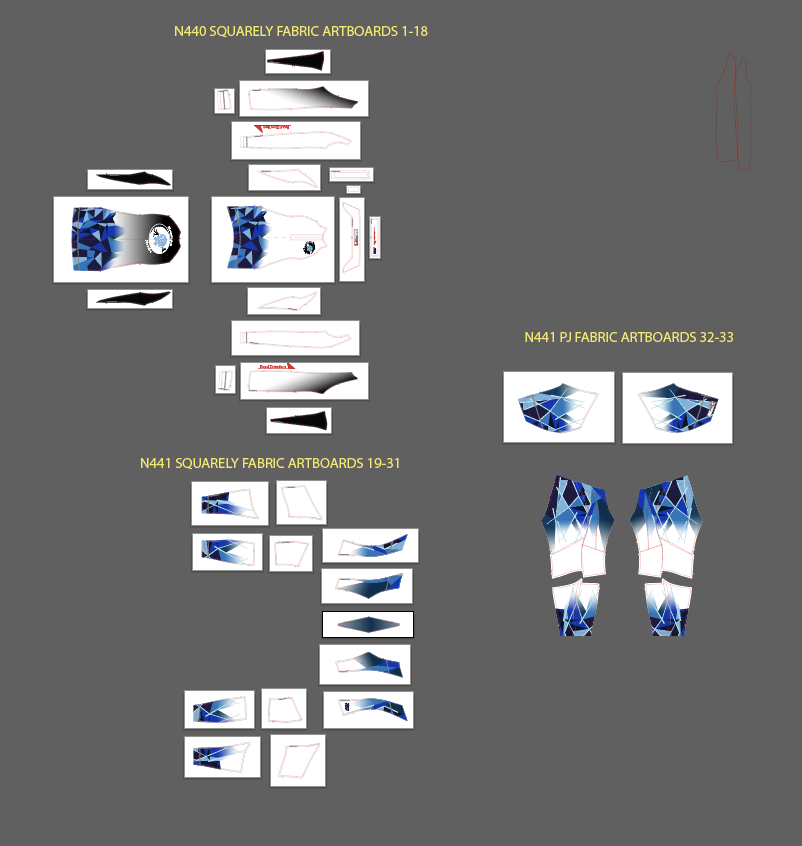
Then I have my suit pulled up in CLO and am trying to apply this JPEG to the "Fabric" layer or the "Texture"

Typically when the JPEG is applied, it is applied to each piece and fits in like a puzzle. But instead the JPEG is filling in strangely and applying the same image to each piece. Does this make sense?
 0
0 -
So, there's two ways to go about this. First the why:
The texture socket I was talking above in the material properties is at the fabric level. That means that there is no way for CLO to know which part of the JPEG image you are plugging in should go into each of the pieces which share the same fabric. Here is where the UV Maps in other software can be used to do exactly that, but is not how CLO works. Because we don't use UV Maps (UV maps is a way to translate 3D coordinates to 2D coordiantes for applying material color, normal maps, etc.) then we have to tell CLO exactly what each piece of your garment will use as a print (texture).
Method 1: Create a different fabric for each piece (sleeves, front, back, knees, etc) and then plug into the texture socket an image that is created from each artboard that corresponds to that piece. Make sure you use PNGs and the outside of the piece shape is transparent. Then you can rotate, move or scale accordingly with the method I described in the first post.
Method 2: Use one single white fabric with a white color as texture (no image needed to be plugged in that socket) and add a graphic on each piece in the 2D window. This will be overlaid (and the colors are multiplied if I remember correctly to your texture color. That is why I suggest white which means "1"). You can scale, rotate and move each graphic to match every piece. I recommend using PNGs with transparency outside the prints border, so the white of your fabric will show through in case your artboard shape does not match exactly your pieces' patterns in CLO.
Let me know,
Pablo
1 -
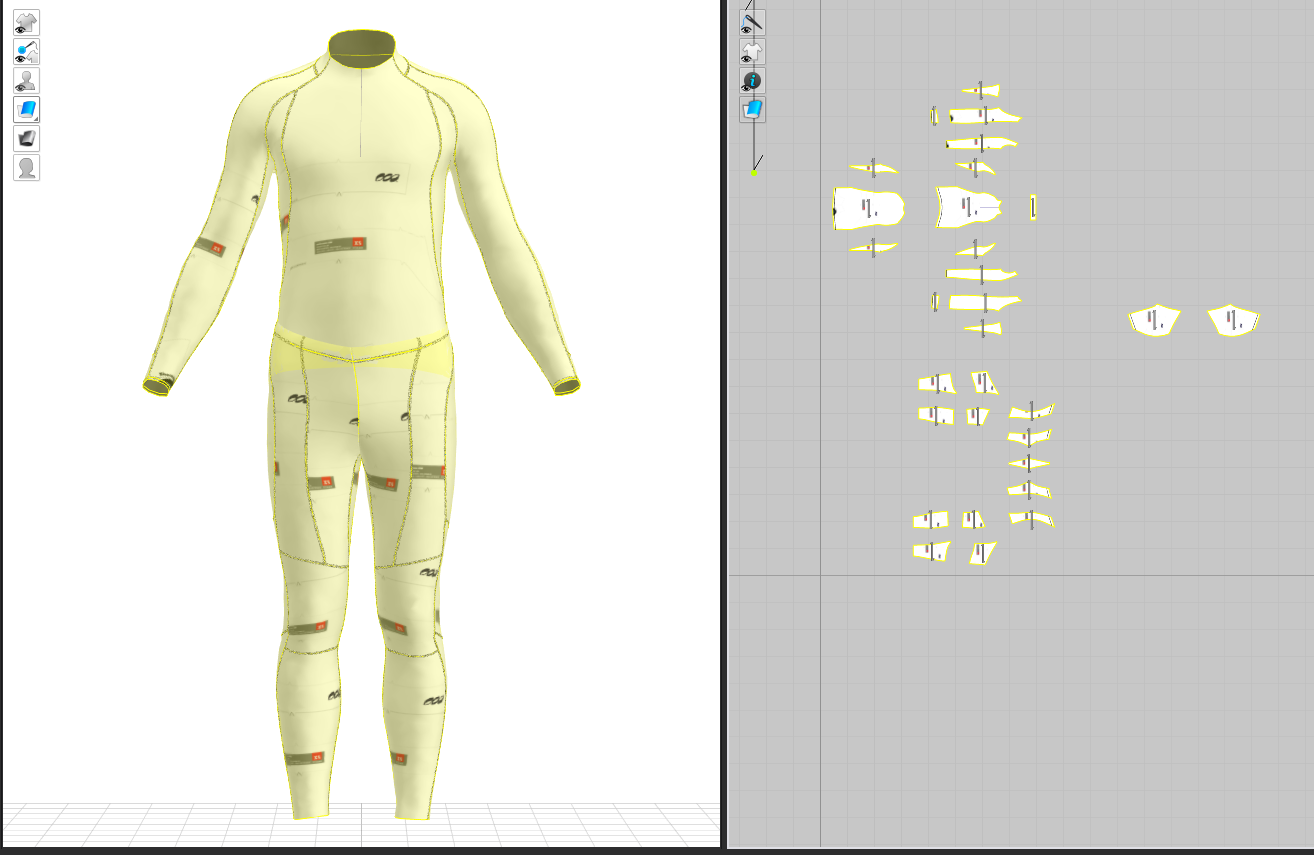
ottoline, a great post as always. I sometimes find difficult to follow what you say. I figured out from what you wrote that, if you prepare your Adobe Illustrator file with all the pattern pieces in the right scale (without seam allowances which would be different from the file that goes to the printer) and add them the graphics in the right place, you can import such AI file as a pattern and using the Import as Graphic option in CLO, you can get the pattern pieces with the graphics in the right place.
Now, you'd still to stitch everything.
I'm still trying to find a way to import the graphic as an UV Map as you said is possible Marvelous Designer. That way will allow you to use a garment already assembled in CLO. Can you share more light here?
P
0
评论