Help - How to create internal cuts on patterns

Hi Everyone,
I've been wondering for a while if it is possible to create an internal cut on a pattern piece in Clo. I am designing a lot of heat sealed garments with clean cut edges etc, and this has come up for me a few times.
For example, instead of creating a sewn on pocket, I want to just make a 'slit' where the top of the pocket is on the internal line, but not al the rest of the way around the pocket. Is there a way to do this?
Image is attached, the line I want to cut is the one highlighted yellow.
All suggestions appreciated, I'm still learning...
-
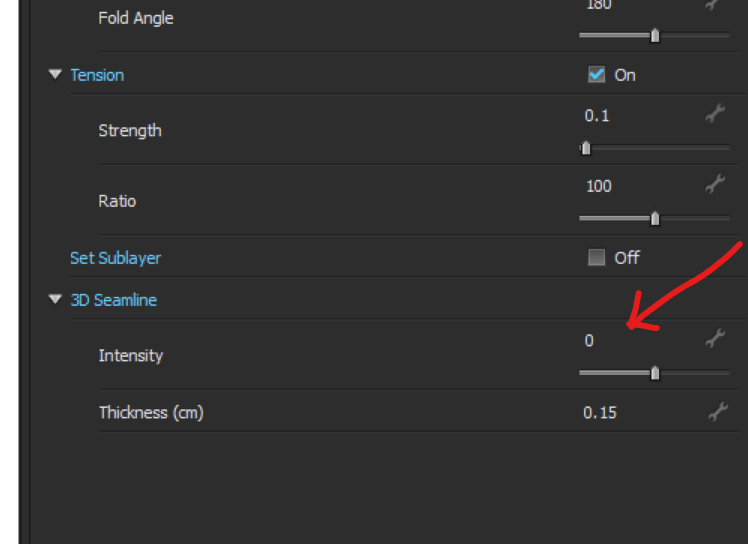
Hi Eliza. You're right. You can't use the Cut function to create the slit. A way around it is to cut all the way to the pattern outline. Pick and outline that is close to one of the extremes and that is not too curved.
Then turn the 3D Seamline Intensity to 0. Check it out.
P

 1
1 -
Hello Eliza
I do quite a mix of high tech garments for manufacture, and for these internal pattern details I always use a rectangle if it's a straight line, or if it's a curve a slight offset poly-line (0.4mm) with capped ends, then simply use the cut shape tool in the pattern, that is belt and braces workflow for a few reasons.
A) it lets you place into the 2D pattern the correct geometry lines that can be centered on items using the auto-curser and align tools for quick and easy placement
B) when you pass the patterns to DXF or onto direct CNC cutting there is a shape that can be placed with it's relative offset. Critical for placing in additional manufacture detail as a laser often needs to have a curved end so it's a continuous line (loop) with no sharp end points that cause heat spots (blow-out) to form in the fabric.
C) You can do curved polylines/nurbs in exactly the same method.
D) it allows you to place an overrun (knife cut bleed) on the drafting which can be essential for insertion of details or trim that need to have termination eg: zips or round non-rip corners.
I use this as we tend to laser cut the 1st batch of samples, rather than higher volume knife tools later, and when you do that you can radius the ends of the slot so the laser runs around the shape nicely cleaning up the edges. You can make this as thin as your process needs in manufacture.
Laser cut/knife cut Drafting shape centered on pocket line.
Most importantly > you can add these shapes to your library so they are just standard drag and drop that align to pockets on center 100% confident you don't have to keep redrafting details and getting possible errors. So that speeds the workflow.
When you export DXF you get the option to take closed shapes and swap out detail. So when I move to production I can isolate details across a garment and place in an Xref and update garments globally die to the shape Xref. Which is a good way to drive the drafting process across ranges. You can also add these types of shape in CLO3D as insertion details (much like the button hole) - which makes for consistent ISO style drafting into manufacture.
Small over shoot (bleed) on laser cut (radius ends) so ends have no stress and are fused. Can be as little as 0.4mm overshoot on slit width with a rectangle at 0.4mm thickness - makes sure you have a little tolerance factored in to the drafting. The slit can be as small as your material and laser needs to fuse the pocket without getting a melt point (blow out on thin nylons) - hence the laser needs a continuous line (loop to track) at equal speed at pick up and put down onto the fabric. Later > If you then go and knife cut the shape is positioned based on the center of the narrow rectangle and the slit will be place at the center of the rectangle. This ensures all drafting is simply based on shape centers and using align tools when drafting, no complicated positioning. And if you do a complex curve slit'cut the same principle applies. Then the shape (slit) can always be found as a closed shape on DXF AAMA export between systems with it's center and alignment in drafting found.
When you make your library of slit shapes you can also place a small radius on them. That way when you export them as DXF they will be picked up in the next workflow so the laser has a good shape to work with as an Xref in the drafting CAD.

Same manufacturing and drafting principle applies even if you have curved polyline shapes being slit lasercut/knifed. And most importantly the slit shape sit on the pocket via the easy to align center so in positioning in drafting is quick and precise. (CLO3D has align and nudge increment drafting tools)
Tape (8mm) applied to edge so that the pocket does not sag on assembly (important in simulation).
2 -
Ottoline, I like this method. Thanks for sharing.
P
0 -
Hi Ottoline,
This is so incredibly helpful and enlightening for me. I've been creating patterns in Clo that I do, as you picked up, export for use in a CNC machine. The CNC machine is mainly used for heat sealing inflatables. I do most of my fabric based heat sealing by hand as I'm a recently graduated student and didn't have access to all the equipment I needed to do a full production type approach to heat-sealing garments. I've been doing a lot of post processing in illustrator to prep files for use with the CNC machine. Now I'm working on refining some of those methods, and my Clo skillset in general, post school while I have a little down time.
Thanks for such an in depth response. I really really appreciate it.
0 -
Hi Ottoline,
Oddly... I can see a partial of your last response in my email but not on here. Must be some glitch in the site.
It's nice to hear this/connect with you. I've explored a variety of inflatable methods and tech innovation type work around heat sealing and am actively looking for work in the tech/fashion innovation area (I have a long history of doing technical driven design work and experimental prototyping). I ended up working with CNC heat sealed inflatable because I felt it was the easiest for me at the time to see more immediate results in terms of experimentation. Especially on the tight deadlines of a grad school schedule. Most of my work has been directly placed into clothing as I've been working on special needs compression garments, so they are very user driven, from inflation system to wearability of the garments.
So your tips have been very helpful as I'm currently enjoying going back and refining some of what I've explored in the last year and seeing where I can take it from here. Thanks again
0
评论