Rendering Problem

Hello Clo Team.
I have been using CLO from a long time . i have been struggling with a glitch many times during my renderings.
i know all the settings and controls of particle distance , but a weird thing happens with some of my files,
i have set particle distance to 5 and rendering quality on higher settings ,

shadows and wrinkle are not smooth as compare to my other files. i have spent a whole day to complete this project.
do let me know if anyone know the issue i m having with my file.
It will be really appreciated.
Thanks
-
ukmughal, it's hard to assess without seeing your patterns and other settings, like which fabric, how tight is your garment, etc. I will suggest some ways I would try to solve it: 1. Pull the garment down to eliminate the wrinkles, 2. Strengthen the piece for brief moment to eliminate wrinkles and then stop simulation, 3. Iron that piece with 3% shrinkage just to smooth that part.
0 -
It's likely that the normal map in the fabric texture you are using is set too high and that is creating the 'faceted' grey shadow result on the render from the fabric shader setup. Try maybe shifting it lower (towards zero - say 10 and see how that works or go slightly lower) and see if vray handles it better. You may also need to check your lighting (HDRI and lamps) if you changed your HDRI maybe blurr it a little , as the shadow catcher aspect of the render engine seems to be picking up on the faceting rather than the curvature normals of the tri mesh. Which means you likely crushed that value. Check your render quality settings for light and materials and maybe raise it up to > very high that should make the shadow catcher kick in if the shader normal threshold was set too high for that fabric texture bump normal. And if all else fails try a CPU render rather than a GPU render just to check it's not a GPU error.

Try tweaking these values (orange highlights) and see what you get.
Nothing to do with mesh density - it's a rendering shader and light issue, if curvature is being rendered incorrectly (which is obviously is from the images posted) you need to adjust that aspect of your project.
FACT: All low poly mesh can be rendered smooth when the normals for flat surfaces are calculated correctly. However if you do not set your shaders and render engine tolerances to accommodate both the surface scale and faces you can get very mixed results. And that is what is happening here. When you see this you need to know what it is and why it is happening, then adjust those factors. It's not a mechanical issue of geometry - it's a light, relative to the surface render interpolation issue.
0 -
ukmughal, what ottoline mentions sounds interesting. I'm very much interested in finding out if this is a shader/rendering issue or a geometry one.
Can you let us know what was the issue?
0 -
pablo.quintana ottoline Thank you so much for the advice. I think I had a similar problem to ukmughal's, so I have tried the solutions you have provided.
So I have first tried bringing down the normal map intensity, and set the quality render for light and material to very high. This improved the garment slightly, but not very much.
What really helped was to strengthen the pieces for a couple of seconds, it really smoothed out the surface of the blouse.
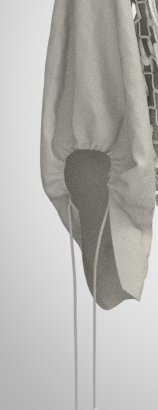
Also, the mesh type was quad and the particle distance was 10 in this case.
0 -
TIPS:
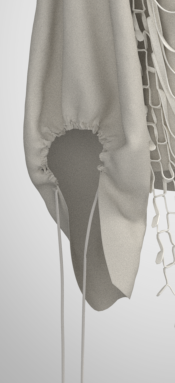
I think you need to be careful with using strengthen on an existing fabric preset as you are changing the 'drape' quality and not the render quality, and these are two different things. You can still get a smoother drape (left image) by dialing down the patterns mesh particle distance (one option) locally in the elasticated gathered areas and then use a good fabric preset (it appears to be showing the triangular surface facets in the left image) so the cloth simulates softer with more surfaces (triangle faces) for the crease frequency. That will smooth out the mesh simulation physically > you can also switch the simulation algorithm to CPU > best quality that will again create a finer simulation step and stop the roughness in the simulation. Finally once you have a good simulation you can actually switch the pattern mesh from tri-mesh to quad surfaces, and run the high quality simulation once more. That will allow you to subdivide the mesh so you can squeeze out more smoothness at higher mesh count scale.
0 -
ottoline Thank you for the tips! How do I make a good fabric preset? I have been trying to play around with the properties but I am not sure what to do to change the fact that the triangular surface facets are showing.
0 -
To tweak an existing fabric:
It's easier to understand the physical presets when it gets broken down into the 8 trait's they cover relative to > warp/weft/bias :
Stretch | Shear | Bending | Buckling | Stiffness | Density | Friction | Dampening
The items in bold are the primary factors that give the fabric it's character ie: if you held it in the hand and scrunched up the fabric you could say these effect how it reacts at ratios (0-100). Some factors are linear others are hockey stick shaped curves. Over a range of fabrics it gets easier to know where to move sliders if you want to tweak a physical preset to get an effect if you don't have measurements to hand.
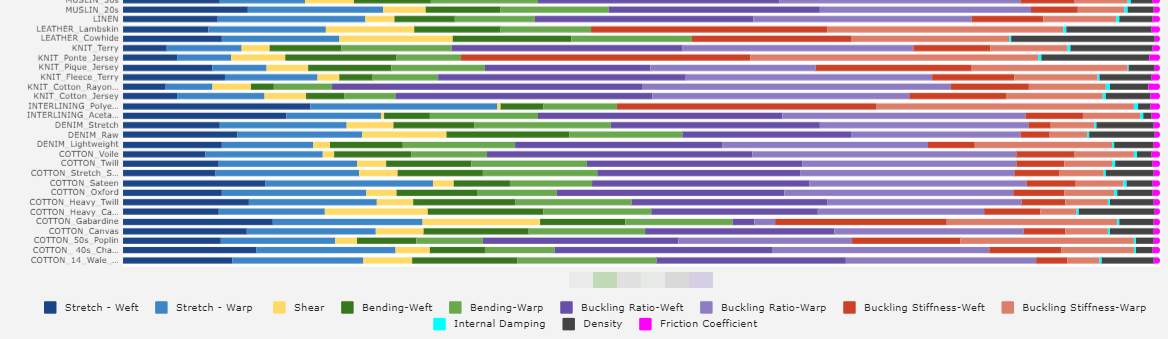
So if your fabric is buckling you need to reduce that trait (2 or 3 slider) component. You can see above how the ratio's of sliders work for each trait group for the basic fabric types that come with CLO3D. Some more than less (eg: purples ratio relative to other colors. So I mapped these out for all the old existing standard fabrics to get a better idea (visual) of how that works across soft to creasy fabric types. I need to update that visual to include the latest physical presets (some now have 3 sliders per trait).
_ _ _ _
It's actually pretty easy to make a new custom fabric preset with CLO3D.
I recently got stuck with covid in lock-down and had to create some fabrics without using all my costly studio hardware for fabric testing (FAST) test methods so that covers more tests than CLO3D does for fabrics, and so I set it upon myself to break the boredom with a frontal lobe exercise in spatial thinking and see if I could create a home bound hack using what was in the house and cupboards to measure a fabric sample accurately (within a few percent) of my calibrated equipment. Much to my surprise it was easy to do with basic items found in most households.
- You need a thick book (I used the Oxford dictionary)
- Digital kitchen scales
- 1 sheet of A4 printer paper (for measuring thickness)
- Some tape + 2 pins + one ruler
- And one standard travel luggage hand scale. (It's actually a force meter but no one wants you to know a $8 item can replace a $500 item )
So with those classic 5 household items you can measure fabric and make brand new presets very accurately. (Almost as good as my expensive gear in my studio).
The process is incredibly simple and it is my contribution to 'lock-down' syndrome as a novel hack for making custom CLO3D fabric presets. It works.
The jist of it is here in this lengthy post. (>> Link) But maybe I should make a dedicated tutorial how to do this with pictures, as it's really a lot more simple than you might think.
I reckon I could make a downloadable 'heath-robinson' CLO3D fabric testing kit (I am a product designer) that could be made in about 15 minutes for that odd sample you need to test.
0 -
Very interesting explanation, will definitely give it a try! I would love to see a detailed tutorial on how to make a custom fabric preset in CLO. So far I've only watched Substance Designer tutorials on that, but would be easier if I could just use CLO. Especially that you say it's quite cheap and fast too!
0 -
Maybe I make a measurement device people can 3D download and print for free for occasional (cough) use.
It's pretty easy to make the fabric measurement tools that performs the tests to input the data and they can be quite accurate - definitely within acceptable margins of error.
I am traveling so I have a quarantine to go through so maybe I will post a design with instructions on how to make it once I am out of that 2 week lockdown.
0
Comentarios