6 Things to Know About Particle Distance

Hi everyone!
It's your local CLO designer here. I wanted to make a quick post about an important 3D concept: ⭐Particle Distance⭐.
I'm sure if you've visited our forums before or tried out the Help Center, you may have come across Particle Distance and not had any idea what anyone was talking about. It can be a very foreign concept, especially if you've never used 3D before.
So I'll explain some of the basic stuff about PD below:
1. Particle Distance is the resolution of your 3D pattern pieces.
In 3D, every object is made of some kind of polygon mesh. Wikipedia explains it like "A polygon mesh is a collection of vertices, edges and faces that defines the shape of a polyhedral object in 3D computer graphics and solid modeling."
But all you have to know as a newbie to 3D and CLO is that a denser mesh = more polygons. And more polygons = more details that can be expressed on that object. The Particle Distance is not the number of polygons in the mesh though! Since each pattern piece will have it's own set of polygons, the Particle Distance is actually the size of each polygon (the length in mm of each polygon's side). So a smaller the Particle Distance = the more polygons in that mesh. Here's what I mean:

2. You can change the PD of your pattern pieces at any time.
Yeah, just select a pattern piece with the Transform Pattern tool and find Particle Distance in the Property Editor.

If you want to test out PD, open the t-shirt from the library and try to see how much detail is expressed when the PD of the entire garment is at 100 mm versus 5 mm.
3. Yes, things can fall through the mesh too.
When you change the t-shirt PD to 100 mm, you'll probably get something like this:
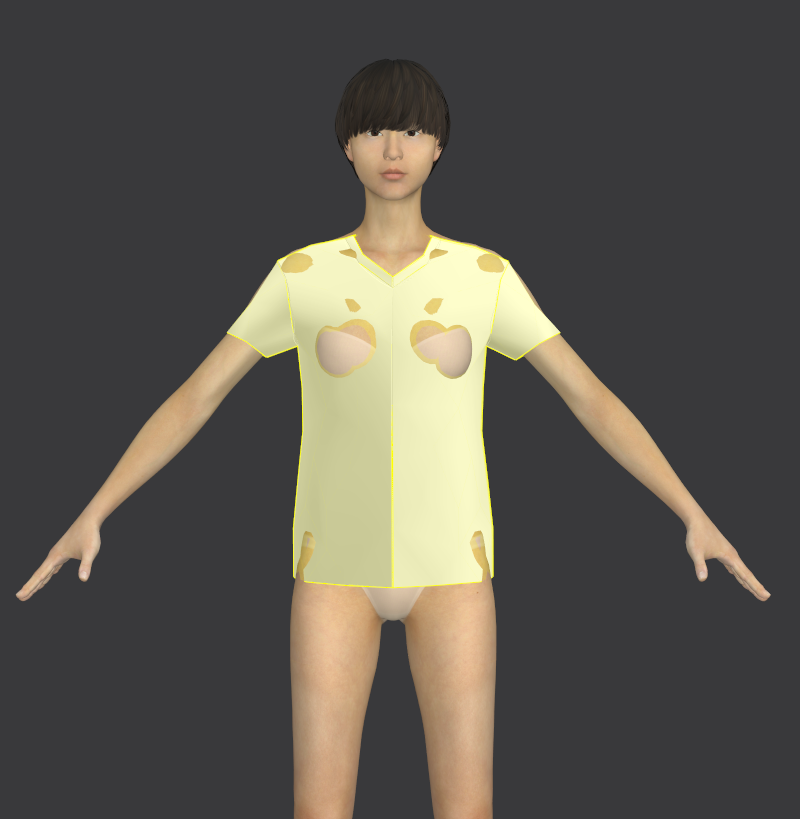
So something to keep in mind: if your pattern pieces are falling through the Avatar or each other, it may be because of the Particle Distance.
4. The default PD in CLO is 20 mm.
But there are some things to keep in mind...........
If a mesh is very dense, more data exists that needs to be calculated by your computer. When things are made with a lot of polygons they tend to slow everything down. Think about early video game characters and CGI movies versus how they look today. Before, game consoles couldn't handle the amount of data it would take to run the kinds of games that exist now. For example:
Versus

To keep things smooth, all patterns that are imported into CLO or created in CLO have a default PD of 20 mm. It's best to keep most of your pattern pieces at 20 while you're working and still figuring out your design details. Then you can change them near the end or when you need to see a higher level of detail.
5. When you've finalized your design, change the PD of all of your patterns to 5 mm to have the best quality resolution.
If you don't want to do this manually, try out the Hi-Res Garment tool.
6. Small pattern pieces should be at 5 mm if you want to see their details.
Though we do recommend a working PD of 20, if you have little pieces that are being difficult (collars, bindings, anything smaller than your hand), you can definitely work with them at a PD of 5. Smaller patterns shouldn't affect the simulation speed so much, but test it out and see what works best for you.
If you have your own way of explaining Particle Distance or another item to add to my list, comment below and share your wisdom!
Anh
-
Thanks, Anh for the explanation.
It could be the beginning of a new series " The Topic of The Week" :)
So keep doing it.Daniele.
0 -
But do not forget that as the PD decreases, the physical properties of the fabric change.
I do not recommend using the value of PD = 5 for the animation. First, the simulation will be very long and not always correct. I do not put PD = 5 for animation, only on small details (patterns)0 -
Particle distance does not change the physical properties of fabric.
They are 2 different concepts and setting.
Particle distance only makes the fabric drape more details.
But for animation, it is a good way to not use PD=5 because of the speed.
0
評論