Avatar Measurements

Hi,
I am trying to edit an avatar's measurements according to a mannequin/ dressform that is used in our company.
All the measurements were taken manually and nearly precisely (as highlighted in the 3D window when selected) and were fed into the respective input boxes.
The method used was HPS for Advanced Details (Dressform) and the avatar used was Male_1 (Dario).
We ended up having an avatar that does not look very human, with a very weird posture.
I have attached an image that shows the avatar and the measurements used.

There are other measurements that can be seen visually and selected but we have no option to input values for them ( and they are grayed out). Are these measurements automatically calculated on the basis of existing measurements that have been fed? Can we change these too?

Are there any other things I should keep in mind while editing the avatar measurements?
Thank You
-
Hi utkarsha, you can take a front and profile picture of your dress form with some measure reference.
Create a fabric rectangle and import your pictures as graphic on these rectangle usuing the meas reference in the pictures to scale them correctly.
Put the two regtangle in the 3d window in the correct position ( they may be 90° rotate and go trough the avatar body )In this way you can compare the POM between the avatar and your dress form. Probably some are taken in different position.
The avatar's posture is highly tied to the CB neck to waist and Cb neck to waist measures.I hope this can help you!
Good lluck.
Daniele.
0 -
 You will need to watch how you approach this as your input measure and output measure readings are maybe out. (the grey text needs to be added to the white figure).
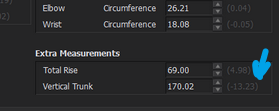 Your 'real' trunk is measuring 156.77 cm (wow) so you need to keep and eye on these and check these measures as you work as they indicate how the adjustments are drifting outside the database conventions. CLO3D indicate these measures to one side.Using the measurement system is like a rubber band on all five fingers on one hand > you move one measure and another changes. That is down to the relational nature of human proportion and the need to keep some measures tied together as you adjust others. Having some perception of that relationship goes part-way to making avatar adjustment easier across your project.
I have done a few hundred custom avatars, there is a bit of a knack to it. Basically you need to get a sense of how their algorithm works across the human scale database. SHS (Sit-Height-Stand) ratio is one of the better ways to approach making a custom avatar as it deals with the torso lengths and girths as opposed to crown height. And I think it has given me my best start point, rather than inputting measures in every box I tend to pick my start point from the nearest avatar ASTM size file > drop that on the avatar and tweak from there. Most clothing sizes will relate to these nearby standards. Then tweak measures from there, always taking note to read off the light grey dimension with the white dimension. This indicates how far out from the database of size you are drifting, which effects posture as you move to far from the human scale within that relational database. So if that happens you then need to find the next measure that resolves that change. Often that means knowing what pairs of dimensions to use and the order in which you adjust them.

So when I remake my custom sizes or new country international standard variants I tend to work using the torso as my main datum to the crotch, and HPS and then stick to simple principles of adjustment > bust waist hips and girths all first. That has enabled me to generate all the measurement charts really accurately with the latest CLO3D avatar system. This is Auzzy/NZ avatars to a specific brief.
My best tip would be > start with the closest ASTM size > then adjust HPS > Crotch > then girths and finally move to hip, waist, bust height. Think of the measures as working as sets that define body proportion. I don't ever adjust them all independently as that would cause all other measures or posture to go out.  So knowing what to adjust first, and what to not worry about too much in how you refine your avatar to finally zero-in on the final form is key to getting a speedy accurate result.


Hope that helps.
0
评论