Multiple garments in one scene - UV issue

Hi there,
Bit of a technical question and I'm not myself a Clo user, I'm posting on behalf of a project member who is using it.
I'm texturing in 3d some garments they are creating, we have made the garments in separate scenes and I have textured those clothes based on the UVs it has outputted. We are going to sim the clothes and render them.
The clothes need to be simmed together, to interact with each other. However, when a second garment is added into the already opened project file, the exported UVs are moved and the textures no longer line up. I have a feeling this is something to do with the Unified UV's and it shrinks them all to fit based on what is in your scene.
Is there anyway to bring in a second garment without changing the UVs. Retexturing will take a while and is quite cumbersome. I tried exporting them seperatley instead of together, but they still have the incorrect UVs.
Thanks,
Michael
-
Are you running the final animation render in CLO3D?
See this thread > HOW-TO-CHANGE-TEXTURE-OBJ-FILE-FROM-OTHER-PROGRAM
Each fabric for a garment can have a texture map assigned. And also each garment pattern piece can have a new or copied fabric assigned. This means you can re-position the UV onto the garment and pattern piece using the edit texture (2D) > position and scale tool (keyboard shortcut T) if you need to manually align them all again. Each fabric can have a diffuse, normal, gloss, and depth map assigned to the fabric and they will all move in unison as you adjust the diffuse top texture.
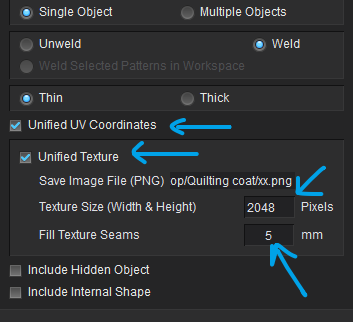
In future when exporting garment models for texturing and re-importing > each garment should use the UV layout tool, and the pattern pieces should be arranged so they fill up the UV map area as much as possible, then just those pattern pieces should be selected and exported > toggling on 'Unified UV co-ordinates' and 5mm bleed to seams at a reasonable size pixel map size eg: 2048pixels or higher. If that wasn't done - you now have a problem.

Above how each garment pattern pieces should be laid out and how it's UV should have been adjusted in size and exported.
It can be overcome but you may need to toss up whether you redo the UV layout in the original garment correctly or you muck about manually repositioning maps at the the pattern piece level for each garment using many fabrics in your material stack.
Let me know which way you want to proceed and I can maybe describe a few options.
0 -
Hi there,
Thankyou for your indepth answer. Yer I'm pretty sure they weren't done like that, so we do have a problem ;(
I think this is going to result in me re-texturing them to be honest, but at least it's good to know for future reference why this has happened.
Thankyou for your explanation, it really was helpful0 -
The edit texture tool, is there a way to get the texture to sit across the 0 - 1 UV grid and then I can manually try repositioning the UVs? The texture can't change, so the edit texture tool seems like the opposite of what I need. I want the texture to stay still and I move the patterns across that texture
0 -
Yes there is a tool for that (T) is the keyboard short cut. Use the Edit Texture 2D to slide the UV map to the pattern pieces. You need to drop a new fabric with the UV map onto the old pattern pieces. But yes you can manually slide the same UV map on the pattern piece. It should come in at the right scale if not you can check that size in the property editor by selecting the fabric in the stack and reviewing it's transformation position. The Edit texture tool gizmo allows you to slide and scale the UV map you have assigned in the fabric. So you need to create a fabric and place the UV maps into that item. Fabric is Kind of like creating a material shader, and you can drop that onto a pattern piece .... but then you use the 2d texture gizmo to slide and scale it around. You can do that at the pattern piece level for each item of the garment.
Fabrics in the Fabric stack can use seamless tiles or UV texture image maps.
_ _ _
Any external object can be loaded into CLO3D as a cloth garment. This means you can actually load a 3D sculpted model into CLO3D and turn it into simulation cloth. And you can assign the original UV maps to that object by creating a new fabric in the fabric stack and assigning the models UV texture maps to that new fabric > then drag and drop that fabric onto the cloth model and it will come into place. The downside with this approach is that it does not give you as much control of the garment as it is no longer editable at the pattern level. But it may be good for you to know this.
0 -
Just to follow up on this, we did a test export using the UV position tool on both garments, by setting the blue box manually then saving them out. They now have set UVs using that tool, but when one is added to the other's file, they don't go into the right place, just like before, they sit outside that blue grid even after setting them up. How are you able to use the UV tool but keep that info when adding garments? I have no idea how that can't be a think, as for most workflows in 3d, UVs are a must. Am I missing something?
0 -
No you are not missing anything here.
When you reload a UV map you are placing it into the fabric which is like a generic material. It knows nothing about the pattern UV layout you may now have in the 2D drafting space. So yes there is a disconnect here compared with texture editing apps. CLO3D is geared for pattern piece drafting and layouts so it is unlike texturing software where the UV position will be remembered relative to the mesh ID group. As there is no mesh ID group on pattern pieces you cannot get the same function as you may have in texture apps. So you need to manually slide it on the pattern piece using the (T) tool.
If you load a prop object into CLO3D, yes the UV map position will load in exactly into place. They are not the same thing - so this extra step is required to slide the map back into position at the pattern piece level. Once you save that project the UV map positions will be fixed relative to the pattern pieces.So when you open up that project they will stay in place.
With there sister company MarvelousDesigner they do have a separate UV mode to overcome this issue, so if you are doing film texturing and CG animation you may want to look at that (MD) as it actually does UDIM and can handle multiple maps.
0 -
Okay, thanks again for that explanation, I'm slowly getting this.
Personally I would have chosen marvelous designer for the project as it's geared more to the VFX / 3d world which is where I come from. Maybe it's UV tools are more to what I am used to!
That last bit is interesting and may be useable as a work around.
Thanks again, I really mean it! It's been a very very long day banging my head against the wall with this problem. I may have more questions in 10 minutes ;) haha
0 -
See MD UV editor mode.
0
Comentários